Although my daily device is a Macbook, there are situations where I need to set up a few virtual machines in order to quickly test something, or set up a lab to learn stuff without worrying much about breaking things. In short, I need systems that I can spin up, do whatever I want to do and then easily discard.
I could do this on the Macbook, but my company doesn’t agree with additional virtualised operating systems on top of our corporate machines and so tools like VirtualBox are not allowed.
My main PC at home is a Windows 10 Pro box, with plenty of RAM and, along with Hyper-V, has been my go-to system for setting up labs.
Not too long ago, my process was this:
- Download an ISO for the operating system I want to use (Centos, Ubuntu, Windows 10, Windows Server, etc)
- Launch Hyper-V
- Create a new VM
- Attach the ISO to that new VM
- Boot the VM from that ISO
- Go through the full setup of the new OS
- Wait for the setup to finish and reboot
- Install any necessary applications
- etc
As you probably very well know, setting up just 1 VM can take well over 30-40 min. Imagine doing this for a lab that consists of 3 to 4-5-6 VMs, it’s an endless pain and a massive waste of time!
This is where Vagrant comes in.
Vagrant is a tool for building and managing virtual machine environments in a single workflow. With an easy-to-use workflow and focus on automation, Vagrant lowers development environment setup time, increases production parity, and makes the “works on my machine” excuse a relic of the past.
I decided to give Vagrant a try and, once I figured out the mechanics, it completely changed my outlook regarding spinning up new boxes. Now I can automate setting up all kinds of VMs without any hassle.
Vagrant can be used with VirtualBox, Docker and VMWare but as you probably guessed, I will be using Vagrant on my Windows 10 Pro PC with Hyper-V, PowerShell and some Bash scripting to quickly set up a lab. I will start with setting up Hyper-V, then install Vagrant and start configuring it.
So let’s gooooooo!
First, Hyper-V
Hyper-V lets you run multiple operating systems as virtual machines on Windows by letting you create virtual hard drives, virtual switches, and a number of other virtual devices all of which can be added to virtual machines.
The requirements for Hyper-V are:
- Windows 10 Enterprise, Pro, or Education
- 64-bit Processor with Second Level Address Translation (SLAT).
- CPU support for VM Monitor Mode Extension (VT-c on Intel CPUs).
- Minimum of 4 GB memory.
The Hyper-V role cannot be installed on Windows 10 Home.
Enable Hyper-V using PowerShell
- Open a PowerShell console as Administrator.
- Run the following command:
Enable-WindowsOptionalFeature -Online -FeatureName Microsoft-Hyper-V -All
If the command “cannot be found”, make sure you run PowerShell as Administrator.
When the installation has completed, reboot.
I will not go into the details of setting up Hyper-V, additional documentation can be found here – Pay attention to the Virtual Switches as these will come into play when running Vagrant.
Then, Vagrant
Installing Vagrant is extremely easy. Just head over to their site to download and install it.
💡 TIP: If you have multiple drives/partitions, make sure you install Vagrant to a disk that has plenty of space. This is where the Hyper-V disks will reside, and, depending on the OS and number of VMs you may be launching, it is critical that space is available. I installed Vagrant on my secondary, larger drive under D:\Vagrant
Finally, PowerShell
Note that you always need to run PowerShell as Administrator for the Vagrant commands. If you are using Windows Terminal to launch PowerShell, you either need to run Windows Terminal as Administrator OR follow the steps here to create a new Windows Terminal PowerShell profile that will always launch with administrative privileges.
And now, The Fun Stuff
Vagrant leverages a declarative configuration file which describes all your software requirements. It is called Vagrantfile and needs to be placed in a new folder in the Vagrant directory. In my case, this would be under D:\Vagrant\<NewFolder>. In essence, any VM or cluster of VMs will be declared under similar folders. For example:
- One Centos VM would be under D:\Vagrant\centos7
- Several VMs could be under D:\Vagrant\ansible-lab, for example
Let’s start simple with just one VM though.
We will be setting up a Centos 7 VM
In PowerShell, navigate to D:\Vagrant and create a new folder named centos7-vm, then browse to this folder and type in vagrant init
PS D:\Vagrant> mkdir centos7-vm
PS D:\Vagrant> cd centos7-vm
PS D:\Vagrant\centos7-vm> vagrant init

A `Vagrantfile` has been placed in this directory. You are now
ready to `vagrant up` your first virtual environment! Please read
the comments in the Vagrantfile as well as documentation on
`vagrantup.com` for more information on using Vagrant.
The Vagrantfile has been created! Note that it is created under D:\Vagrant\centos7-vm
If you have Visual Studio Code installed, type code Vagrantfile to open the file for editing. This is by far my favourite editor, but feel free to open the file using your preferred editor (Notepad, Notepad++, Sublime, Atom, Vim… even Wordpad will work!) and check out the file
With all the comments (lines starting with #) removed, the file looks like this:
# -*- mode: ruby -*-
# vi: set ft=ruby :

Vagrant.configure("2") do |config|

  config.vm.box = "base"

end
Delete everything and copy/paste the following:
# -*- mode: ruby -*-
# vi: set ft=ruby :

Vagrant.configure("2") do |config|
  config.vm.box = "generic/centos7"
  config.vm.network "public_network"
  config.vm.synced_folder ".", "/vagrant_data", disabled: true
  config.vm.provider "hyperv" do |h|
    h.enable_virtualization_extensions = true
    h.linked_clone = true
    h.memory = 2048
    h.cpus = 2
    h.vmname = "centos7-vm"
  end

end
We are basically telling Vagrant to create the following:
| Command | Action |
config.vm.box = "generic/centos7" | Go get a Centos 7 VM generic image… |
config.vm.provider "hyperv" | … Using Hyper-V as your provider … |
h.memory = 2048 | … And set up the VM with 2GB RAM … |
h.cpus = 2 | … And 2 CPUs … |
h.vmname = "centos7-vm" | … And name this VM “centos7-vm” … |
Save the file and jump back to PowerShell and type vagrant up
This action will read the Vagrantfile and start working its magic! Provided all steps were correct, you should be seeing the following output:
PS D:\Vagrant\centos7-vm> vagrant up

Bringing machine 'default' up with 'hyperv' provider...
==> default: Verifying Hyper-V is enabled...
==> default: Verifying Hyper-V is accessible...
==> default: Importing a Hyper-V instance
    default: Creating and registering the VM...
    default: Successfully imported VM
    default: Please choose a switch to attach to your Hyper-V instance.
    default: If none of these are appropriate, please open the Hyper-V manager
    default: to create a new virtual switch.
    default:
    default: 1) External
    default: 2) Default Switch
    default: 3) WSL
    default:
    default: What switch would you like to use? 1
    default: Configuring the VM...
    default: Setting VM Enhanced session transport type to disabled/default (VMBus)
==> default: Starting the machine...
==> default: Waiting for the machine to report its IP address...
    default: Timeout: 120 seconds
    default: IP: 192.168.1.27
==> default: Waiting for machine to boot. This may take a few minutes...
    default: SSH address: 192.168.1.27:22
    default: SSH username: vagrant
    default: SSH auth method: private key
    default:
    default: Vagrant insecure key detected. Vagrant will automatically replace
    default: this with a newly generated keypair for better security.
    default:
    default: Inserting generated public key within guest...
    default: Removing insecure key from the guest if it's present...
    default: Key inserted! Disconnecting and reconnecting using new SSH key...
==> default: Machine booted and ready!
Note that depending on the Virtual Switches you have set up in Hyper-V, you are prompted to enter a number to select which will be used.
In my case, I created an external virtual switch named External and bound to my network card in order to allow this VM to communicate with the outside world:
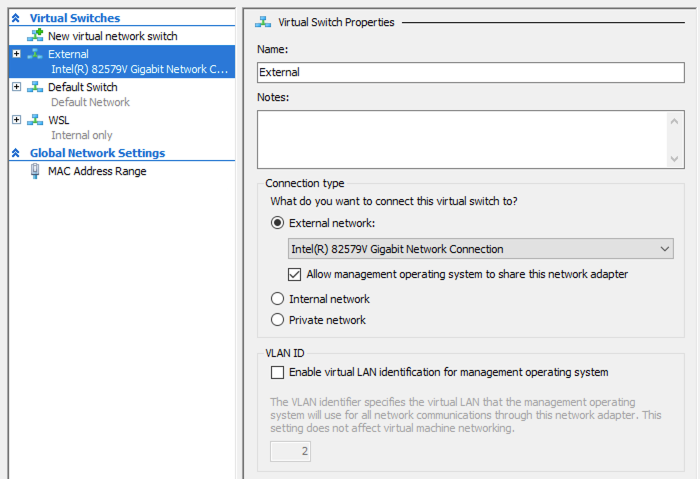
In the PowerShell output above, also note the following fields:
- SSH Address
- SSH Username
Now, to log in to your newly created VM, you can simply type vagrant ssh
PS D:\Vagrant\centos7-vm> vagrant ssh

[vagrant@centos7 ~]$                            <--- I'm in the Linux box! It's MAGIC!
Just like that, we set up a Centos 7 VM without downloading any ISO files and going through the lengthy setup process of the Linux machine.
Once logged in you can configure your apps etc. But we can still do more!
Tune in for Part 2 for more fun with Vagrant 😎
If you found this helpful, feel free to…
