Consider this: Are you running several services on your home workstation/server/Raspberry Pi and would like to be able to securely expose them to the Internet for easy access, management and/or monitoring when you’re not there? If yes, then this article could be just what you’re looking for 😎
Intro
I still use a VPN to connect to my home when I’m away, but there are some services that I would like to be able to access remotely by directly hitting an FQDN instead of a private IP address. Let’s consider Grafana for example, a very popular analytics and visualization web application. In ye olde times, I would launch my VPN client (installed or configured on my own laptop and mobile phone) connect to my home gateway, launch a web browser and type in, for example, http://192.168.10.10:3000. Ignoring the whole VPN connection process, there are already a couple of problems with this URL:
- I need to remember the IP (and/or hostname) and port of the service
- It doesn’t look too secure (httP vs httpS), despite just being a service I run in my house for my own, exclusive use.
What if, instead, I could launch any browser on any system to reach my own, privately hosted web application securely, just by typing grafana.apexlemons.com and have this URL 1) redirect to HTTPS and 2) prompt me for a password before even showing the Grafana web page?
So far so good, right? Now check this: WHAT IF this URL didn’t visibly trace back to my home IP address? Even better!
But there’s still a problem. My home IP is not static, meaning it is regulated by my Internet Service Provider (ISP) and will change regularly, i.e. every 2-3 days. Since Grafana is hosted at my home, I need a way to let the world know that grafana.apexlemons.com is not reachable at this public IP anymore (my home IP), but this new one (my updated home IP). And 2-3 days later, let the world know – once again – that the previous IP is obsolete once more, and use this new IP (my yet-again-updated-home-IP).
This is where a combination of tools and configurations is required. To solve the above we will need:
- To purchase a domain (i.e. apexlemons.com) – This is super cheap nowadays.
- To sign up to CloudFlare and point our domain there – This is free and very easy to achieve.
- To set up a mechanism that will automagically update apexlemons.com’s DNS record to that of our home IP – This will be achieved by running a Docker container that does just that.
- To set up a proxy and expose our web service to the Internet with free SSL termination using Let’s Encrypt – This will be made possible with Nginx Proxy Manager, running on Docker
All in all, this is what this will look like:

- A visitor requests https://grafana.apexlemons.com
- CloudFlare resolves grafana.apexlemons.com → apexlemons.com → my home, public IP
- Inside my network, Nginx Proxy Manager translates grafana.apexlemons.com ←→ http://192.168.10.10:3000
- And thus the container is reached and relayed to the visitor or myself, using a Let’s Encrypt certificate
The beauty here is that I’m running additional services on the same Docker host (a Raspberry Pi): Home Assistant, Plex, Portainer, even a couple of sites, all of which are using different ports and which I can easily expose via Nginx, like app1.example.com, app2.example.com, app3.example.com etc.
Let’s go set this up.
Please note, at this point, that most of my services are dockerized. For the steps that will follow, I will assume that you have Docker installed and some experience with it, as both Nginx Proxy Manager and the IP updater need only run under Docker.
Show some CloudFlare love ❤️
CloudFlare is by far one of the best services out there. So much, in fact, that when CloudFlare goes down, major companies are dragged down too. CloudFlare is a web infrastructure and website security company that provides content delivery network and DDoS mitigation services. Cloudflare’s services sit between a website’s visitor and the Cloudflare customer’s hosting provider, acting as a reverse proxy for websites.
Cloudflare can do a lot, but in our scenario we will simply be using the DNS section.
Once you purchase your domain, follow this article to change your domain’s nameservers to point to Cloudflare’s. This should be fairly quick but note that it may take up to 24 hours for registrars to process nameserver updates.
If not sooner than 24 hours, you should see a few A record entries under Cloudflare’s DNS tab.

- Log in to the Cloudflare dashboard.
- Under the My Profile dropdown, click Account Home.
- Select your domain
- On the right pane, scroll down to Get you API token
- Click on Create token, select Create Custom Token and use the following settings:
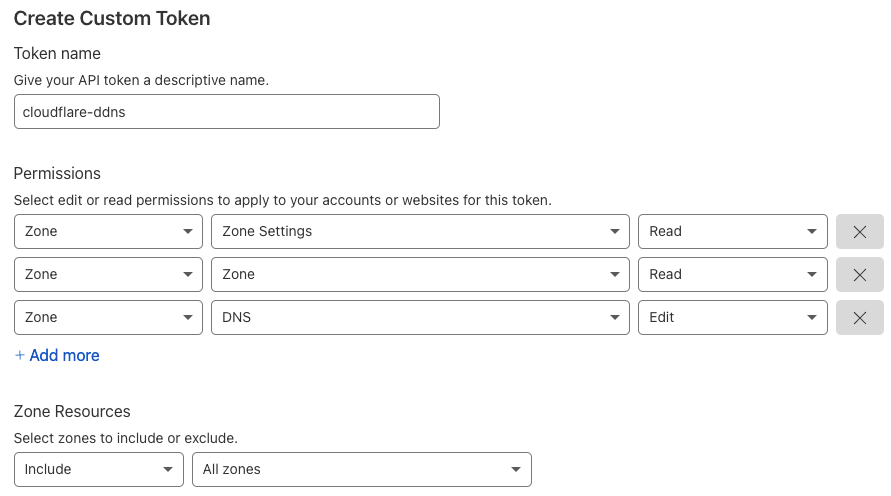
Now let’s set up the Docker image that will be used to update our Cloudflare’s domain A record with our public IP.
You can use docker-compose or Portainer’s stacks, whatever suits you best – You will just need to run the following:
version: '2'
services:
  cloudflare-ddns:
    image: oznu/cloudflare-ddns:latest
    restart: always
    environment:
      - API_KEY=XXXXXXXXXXXXXXXXXXXXXXX
      - ZONE=apexlemons.com
      - PROXIED=true
      - PUID=1001
      - PGID=1001
Make sure you:
- change the
API_KEYvalue to the one generated on step 6 - change
ZONEto reflect your domain - change
PUIDandPGIDas necessary
💡 More details here.
This container will now make sure that if your home IP changes, the Cloudflare IP changes accordingly. By default, the check is performed every 5 minutes, which is pretty decent.
Jump back to Cloudflare, select the DNS tab and, provided everything ran smoothly, you should now see your domain’s A record pointing to your public IP address.
Magic! 🪄
Create a CNAME record for your service
While you’re still under the DNS section, create a CNAME for your application by clicking Add record and changing the Type, Name and Target as follows:

A CNAME is an alias. In this case, grafana.example.com is an alias of example.com.
This way, hitting grafana.example.com will resolve to example.com (the @ symbol) which will eventually resolve to my public IP address.
So you can set up multiple services:
| Type | Name | Target | Proxy Status | Resolves to | Which in turn resolves to | Which finally resolves to |
| CNAME | unifi | @ | DNS only | unifi.example.com | example.com | Your public IP! |
| CNAME | plex | @ | DNS only | plex.example.com | example.com | Your public IP! |
| CNAME | portainer | @ | DNS only | portainer.example.com | example.com | Your public IP! |
To test, you can attempt to ping your service(s), and it/they should resolve to your one public IP
host grafana.apexlemons.comIf your public IP is returned, then you have successfully set up Cloudflare! 🎉
💡 Note: To quickly check your public IP address from a terminal, you can run curl ifconfig.me – Alternatively, you can use something like whatismyip.com
Also note at this point that when you ping your service.domain.com, your public IP is returned. This is not very safe but we can obfuscate it by setting the DNS record (in this case the CNAME record(s)) as “Proxied”. However, we need to do this AFTER setting up the Nginx Proxy Manager.
Nginx Proxy Manager Setup
NGINX Proxy Manager requires a couple of containers to run, namely the app and the MYSQL database. Let’s create those with the following:
version: '3'
services:
  app:
    image: 'jc21/nginx-proxy-manager:latest'
    restart: unless-stopped
    ports:
      - '80:80'
      - '81:81'
      - '443:443'
    environment:
      DB_MYSQL_HOST: "db"
      DB_MYSQL_PORT: 3306
      DB_MYSQL_USER: "npm"
      DB_MYSQL_PASSWORD: "npm"
      DB_MYSQL_NAME: "npm"
    volumes:
      - ./data:/data
      - ./letsencrypt:/etc/letsencrypt
  db:
    image: 'jc21/mariadb-aria:latest'
    restart: unless-stopped
    environment:
      MYSQL_ROOT_PASSWORD: 'npm'
      MYSQL_DATABASE: 'npm'
      MYSQL_USER: 'npm'
      MYSQL_PASSWORD: 'npm'
    volumes:
      - ./data/mysql:/var/lib/mysql
Make sure you change the MYSQL user and password, as well as the root password.
You can opt to change port 81 (used to manage NGINX), but leave the 80 and 443 ports as they are.
Also note that if these ports were previously already in use on your server, you may need to reallocate the ports of your original apps. In general, it is a good idea for the proxy to have these dedicated.
Also, you will need to port-forward port 443 on your router. Simply add an entry for TCP 443 to whatever IP your Nginx Proxy Manager server is at.
For example, I created the container on my server at 192.168.10.12. To set up my router, I found the section regarding Port Forwarding and added the following:
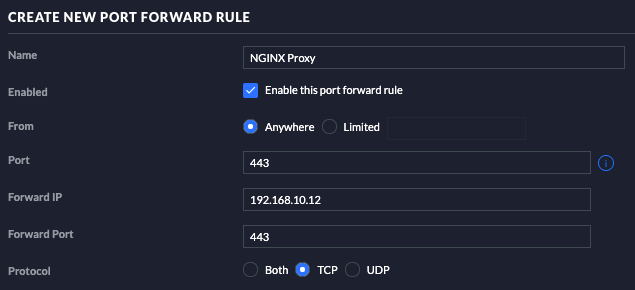
The default user is admin@example.com and the default password is changeme. Once logged in, you will be prompted to change those.
Next, go to Hosts > Proxy Hosts > Add Proxy Host and add the entries for Grafana, using your new domain name.
As stated before, I connect to Grafana internally using http://192.168.10.10:3000. This is exactly how I will be mapping it in the details:
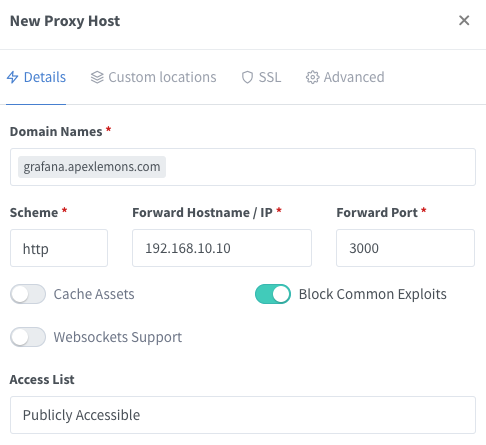
I like to select Block Common Exploits. This is also recommended in the documentation.
At this stage, you can opt to save and test the connection first.
To test the connection, you can click on the Proxy Host name:

Now, the interesting part, we need to request a certificate.
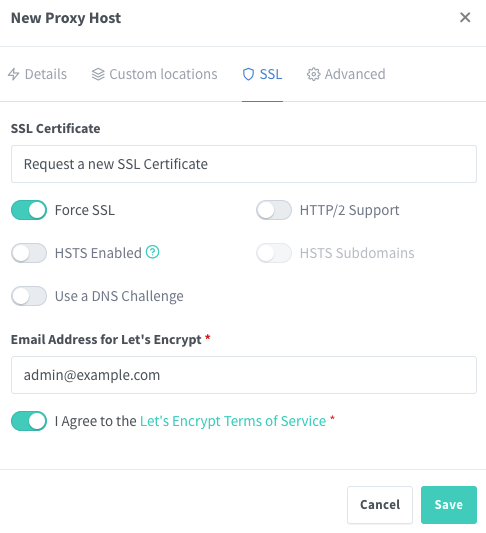
Note that for the certificate generation to be successful, your CNAME record must be DNS Only. Once the certificate has been generated and applied, check your connection to the service. If this is successful, you can (and should) set the CNAME to Proxied in order to completely obfuscate your public IP
After setting your CNAME record to Proxied, you should not see you public IP but rather the entries provided by Cloudflare:
> host grafana.apexlemons.com
grafana.apexlemons.com has address 104.20.3.12
grafana.apexlemons.com has address 172.61.1.12
grafana.apexlemons.com has IPv6 address 2303:4700:2030::aa43:81ba
grafana.apexlemons.com has IPv6 address 2606:4700:3065::1825:1ce
By now, browsing to https://grafana.apexlemons.com works outside my home, and is secured with HTTPS!
Next up, further securing our web server with Access Lists.
With a simple Access List in Nginx Proxy Manager, you can define a custom policy based on credentials or IP addresses. Let’s have a look at how that works.
Access Lists
An Access List, also sometimes referred to as “ACL” in IT is a prefined list of access rules. This is very useful for any administrative application such as Portainer, Bitwarden, or the Nginx Proxy Manager web interface itself. It’s also useful to lock down access to applications that are vulnerable themselves. In Nginx Proxy Manager you can create a new Access List and select them in any proxy hosts.
Access based on User
In the “Authorization” tab you can enter usernames and passwords to authenticate users to your application or service. This is very easy and self-explained. Unfortunately, it’s limited to 5 users max. But one cool feature is, that you can also forward this authentication to the real server with the “Pass Auth to Host” flag. This will send out an HTTP Basic Auth packet.

Access based on IP Address
You can also define up to 4 rules based on IP Addresses. You can select if you want to specifically allow IP addresses or block them. They are applied in the order they are defined, so when there is a match all other rules below are ignored. It’s important to mention that you can not just enter a single IP address, but also networks. So in this example, I’ve blocked the network 192.168.0.0/24 completely. That means all IP addresses from 192.168.0.1 to 192.168.0.254 are allowed to connect via this Access List.

Combination and ruleset
How does it work when you combine an Authorization via credentials and an Access list by IP addresses? If you enable the “Satisfy Any” checkbox in the main tab, that means that either the authorization or the IP addresses need to match, but not both. If you disable it, both need to match to validate access to the proxy host. This can be very useful if you have some IP addresses that may be valid to access an application, but this is not secured by password authentication.
Note, currently in Nginx Proxy Manager, if you change anything in an Access List that is already present in a proxy host, you need to save the proxy host object again! This took me quite a while to figure out and probably is something that should be improved in a future version of the Nginx Proxy Manager.
After all is set up, under the hood a typical Nginx config is at play:
# ------------------------------------------------------------
# grafana.apexlemons.com
# ------------------------------------------------------------

server {
  set $forward_scheme http;
  set $server         "192.168.10.10";
  set $port           3000;

  listen 80;
listen [::]:80;

listen 443 ssl http2;
listen [::]:443;

  server_name grafana.apexlemons.com;

  # Let's Encrypt SSL
  include conf.d/include/letsencrypt-acme-challenge.conf;
  include conf.d/include/ssl-ciphers.conf;
  ssl_certificate /etc/letsencrypt/live/npm-4/fullchain.pem;
  ssl_certificate_key /etc/letsencrypt/live/npm-4/privkey.pem;

  # Block Exploits
  include conf.d/include/block-exploits.conf;

  # Force SSL
  include conf.d/include/force-ssl.conf;

  access_log /data/logs/proxy-host-3_access.log proxy;
  error_log /data/logs/proxy-host-3_error.log warn;

  location / {

    # Authorization
    auth_basic            "Authorization required";
    auth_basic_user_file  /data/access/1;

    proxy_set_header Authorization "";

    # Access Rules
    deny all;

    # Access checks must...

    satisfy any;

    # Proxy!
    include conf.d/include/proxy.conf;
  }

  # Custom
  include /data/nginx/custom/server_proxy[.]conf;
}
I hope this article was helpful to you guys!! If yes, feel free to…

Peace!